+ Reply to thread
Page 1 of 3 1 2 3 LastLast
Results 1 to 50 of 120

Thread: The DoMeBo Photography Class - Lesson #1

  1. #1
    Elephant
    Registered
    Feb 2009
    Location
    San Jose, CA
    Posts
    513

    Default The DoMeBo Photography Class - Lesson #1

    The DoMeBo Photography Class
    Lesson #1 - “Your Camera & You”

    The purpose of this lesson is to familiarize you with you equipment, the basics. The good news is that, because it’s the basics (remember?), you probably know much of this already. The bad news is that everyone’s camera is a little different, and since we’re conducting this class on in the intertubes, I can’t pick up your camera and point. That would be a neat trick, though.

    For this lesson, it would be useful if you have your camera’s manual, but it’s not required. I have no idea where the manual for my Canon Digital Rebel is, myself. (I do know where the manual for my Canon SD550 is, it’s the camera I’ve lost.) Most camera manufacturers have good information on their websites, sometimes even downloadable manuals.

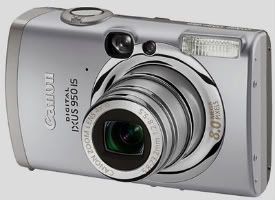
    I will assume everyone has a digital camera. There are two main types, the SLR (for “Single Lens Reflex”), and the point-and-shoot:
    .
    There are also hybrid types positioned for in-betweeners who can’t make up their minds.

    - - - - - - - - - - - - - - - - - - - - - -
    Here are some of the basic components of digital cameras:

    A light-sensitive chip – Digital cameras, instead of light-sensitive film, use light-sensitive computer chips to record images. The number of pixels you sensor can record gives you the megapixel number on your camera, but there’s more to image quality than just this number. Most cameras use a CCD, but some use a cheaper CMOS.
    .
    A lens – Actually a set of multiple lenses to focus light on the chip. Most cameras have a zoom lens.
    .
    A shutter button – The primary user-interface item on your camera. The most important thing to know is that the shutter button has three states: unpressed, halfway down, and fully pressed. The halfway down state sets the exposure, focus, and enables a few other things to be done before a picture is actually taken. Learn to love the halfway down.
    .
    A file-storage medium – Usually a removable card, sometimes internal memory. The removable cards go by many names, and many formats. The little computer in your camera writes the images to this card, and you usually can’t take another picture until it’s done, so cards that can be written on faster can be useful (but usually more expensive, figures).
    .
    A battery – If you have a rechargeable battery, try not to lose the charger. The biggest two drains on battery life are the LCD screen and the flash. The biggest drain on my life is my mother-in-law.

    - - - - - - - - - - - - - - - - - - - - - -
    No doubt there are more buttons and dials on your camera than just the shutter button. On my Digital Rebel, there are three dials, eighteen buttons, a switch, and a lens release. That’s not including the stuff on the lenses. (One button I just found when counting them all. It’s not labeled and I have no idea what it does. Ain’t that great?)

    Some common controls:

    Zoom – On point & shoots cameras, this is either a dial or a set of buttons. Press one way it zooms in, press the other it zooms out. Many cameras feature “digital zoom.” I discourage its use. You can turn it off in the camera’s menu.
    On SLR cameras, you adjust the zoom by twisting a portion of the lens.
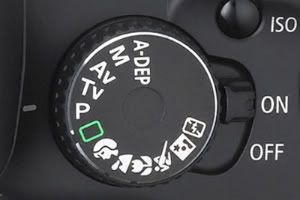
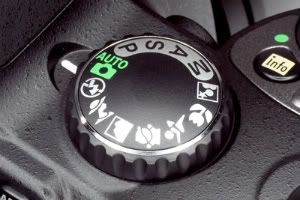
    Shooting modes – This is where cameras differ widely. This is often chosen with a dial, but sometimes it’s in the menu or it’s a button that cycles through modes. Each manufacturer uses their own symbols and abbreviations for different modes. Here is an example of a Canon dial from an SLR:

    The green square is full-auto. The letters are different manual modes, the icons are different kinds of pre-set auto modes.

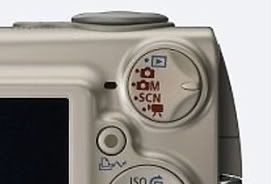
    Nikon uses a similar setup:


    Point-and-shoot cameras will be more simple:
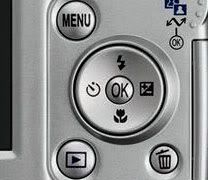

    Menu – Unless you have a touch-screen (lucky), the interface for the menu will probably be a circular set of buttons: up, down, left, right, and an enter button in the middle. Like this:

    These may be labeled with other functions, such as flash control:

    Not a mind-control device for a super hero, this button will cycle through flash’s modes, such as auto-flash, force-flash, no-flash, red-eye reduction, etc.

    (We can cover any and all controls you’d like, see class discussion below.)

    - - to be [del:3jajqfg1]or not to be[/del:3jajqfg1] continued…
    I do not bite my thumb at you, but I bite my thumb.

  2. #2
    Elephant
    Registered
    Feb 2009
    Location
    San Jose, CA
    Posts
    513

    Default The DoMeBo Photography Class - Lesson #1

    Taking a picture.
    You have the camera on, with a storage card in it, and you want to take a picture. (I had no idea.)

    Orientation: Surprise! You can turn the whole camera sideways and it still works! This is useful for taking pictures of people and other things that are taller than they are wide. (I hope the people you’re photographing are taller than they are wide.) In fact, this taller-than-wide orientation is referred to as “portrait.”

    Stabilization: If you do have an SLR, rest the camera on your left hand when you take pictures. If you have a point-and-shoot, just hold it steadily with both hands. The shutter usually fires faster than normal hand-shake, but you can help out by not shaking.

    Zoom: use the zoom to get the right framing and to make things far away appear bigger. The more you zoom in, the more your shaking hands will affect the image.

    Focus: I have no problem with auto-focus, if you can manipulate it. Most point-and-shoot cameras don’t have manual focus anyway. Generally there are spots in the frame the camera tries to focus on. Point-and-shoots use a rangefinder, SLRs adjust the focus in and out until it detects the point of greatest contrast. Newer cameras have often have facial-recognition that works pretty well.

    Pressing the Shutter: By now you should have already fallen in love with pressing the shutter button halfway down for a moment before taking a picture. Different cameras have different ways of telling you if it likes your photography skills at this point. My rebel blinks red lights in the viewfinder where it detects focus, and bleeps, and a dot shows up next to the exposure level bar. You camera will do something. Don’t press the button all the way down until it’s ready, it won’t take long. If you’re shooting action, such as sports, you can be quicker on the draw, but use the camera’s sports mode if it has one.

    Flash: A flash is only good for a few feet. If the auto-flash decides to fire, your subject better be close, or the picture will be too dark regardless of the flash. You know the pretty flashing cameras filling the stands at the Superbowl? Those people’s pictures will come out mostly black. Turn the flash off if your subject is far away and hold the camera as still as you can. Alternately, if you’re taking a picture of someone standing in front of something very bright, force the flash to go off to get the person’s face, which would otherwise be dark because the camera is adjusting to the bright light behind. More on the flash in Lesson #9.

    Saving the picture: The LCD will show you the picture you just took for a short bit, and at this time you can choose to discard the image, but saving it is default. I almost never delete pictures this way unless they are completely white or black. There is always the chance of saving bad pictures later. You can delete them then, too. If you don’t have much storage space on your card, you can be more discriminatory.

    One last note: Somewhere in your camera is the ability to take a time-delayed picture. This is the symbol:

    Figure out how to activate this mode so you never have to take a self-portrait in the bathroom mirror ever again. Those people depress me when I realize they can breed, too.

    A little more to follow...
    I do not bite my thumb at you, but I bite my thumb.

  3. #3
    Elephant
    Registered
    Feb 2009
    Location
    San Jose, CA
    Posts
    513

    Default Re: The DoMeBo Photography Class - Lesson #1

    Class Discussion:
    Ask all the questions you want about your camera’s functions and we will help you figure things out. If you’ve had your camera a while, feel free to give a short review.

    Assignment A:
    Research the available shooting modes available on your camera. You don't have to use them all, just know they’re there. If your camera has a manual mode, read the instructions on how to use it. No, you don’t have to understand it yet.

    Assignment B:
    Take four photographs of stuff. Use the different shooting modes, different orientations, different flash settings, etc. The purpose is not the photographs themselves, but to become more familiar the options on your camera the manufacturers were so nice to have put in there. Try to remember what modes and settings you used, and post that info with the pictures.
    I do not bite my thumb at you, but I bite my thumb.

  4. #4
    Stegodon
    Registered
    Feb 2009
    Location
    Columbus, Ohio
    Posts
    275

    Default Re: The DoMeBo Photography Class - Lesson #1

    Manuals are often available online for cameras, e.g., the one for the Canon Digital Rebel XT (the one that I own) is at http://gdlp01.c-wss.com/gds/09000002...T350DIM-EN.pdf (Warning: PDF file)

  5. #5
    Stegodon
    Registered
    Feb 2009
    Location
    Columbus, Ohio
    Posts
    275

    Default Re: The DoMeBo Photography Class - Lesson #1

    Quote Originally posted by garygnu
    Orientation: Surprise! You can turn the whole camera sideways and it still works!
    In fact, you don't have to limit yourself to horizontal and vertical: you can hold the camera at any angle you like, e.g.:


    (Pictures of the Ohio House of Representatives' chamber and of a replica of Franklin Roosevelt's wheel chair, respectively)

  6. #6
    Stegodon Dragon's avatar
    Registered
    Mar 2009
    Location
    Central Arkansas
    Posts
    335

    Default Re: The DoMeBo Photography Class - Lesson #1

    "Try to remember what modes and settings you used, and post that info with the pictures."

    Shouldn't our fearless leaders do the same?
    No job is too hard for the person who does not have to do it.

  7. #7
    Stegodon
    Registered
    Feb 2009
    Location
    Columbus, Ohio
    Posts
    275

    Default Re: The DoMeBo Photography Class - Lesson #1

    Quote Originally posted by Dragon
    "Try to remember what modes and settings you used, and post that info with the pictures."

    Shouldn't our fearless leaders do the same?
    Is that in relation to my pictures above?

    The first (the Ohio House) was hand-held using available light, in P (Program) mode. Exposure 0.025 sec (1/40); aperture f/4.5; focal length 10 mm (with a 10-20 mm zoom lens); ISO speed 400.

    The second (the wheelchair) was hand-held using on-camera flash, in Auto mode. Exposure 0.017 sec (1/60); aperture f/4; focal length 28 mm; ISO speed 400.

    In both cases, I rotated the picture 45 degrees using Microsoft Office Picture Manager (a program which can do a fair range of basic picture editing functions, such as cropping, re-sizing and colour adjustment).

  8. #8
    Elephant
    Registered
    Feb 2009
    Location
    San Jose, CA
    Posts
    513

    Default Re: The DoMeBo Photography Class - Lesson #1

    About camera setting and photos taken: Your camera probably records shutter speed, aperture, zoom (aka focal length), and ISO settings along with the image. You can see this info if you look at the properties under the “Details” tab.
    I do not bite my thumb at you, but I bite my thumb.

  9. #9
    Stegodon
    Registered
    Mar 2009
    Location
    Los Angeles
    Posts
    155

    Default Re: The DoMeBo Photography Class - Lesson #1

    Quote Originally posted by garygnu
    One last note: Somewhere in your camera is the ability to take a time-delayed picture. This is the symbol:

    Figure out how to activate this mode so you never have to take a self-portrait in the bathroom mirror ever again. Those people depress me when I realize they can breed, too.
    In all fairness, to take a good self portrait with the time-delay you pretty much need to use a tripod. (yeah you could rest the camera on a surface but if the surface isn't just the right height you'll have to pose unnaturally to fit into the frame)

    Some people don't have tripods, and even when you do if the picture isn't particularly important it can be easier just to use a mirror or the old arm's-length shot than go to the bother of setting it up.

  10. #10
    Elephant
    Registered
    Feb 2009
    Location
    Garden Spot of the South
    Posts
    592

    Default Re: The DoMeBo Photography Class - Lesson #1

    Quote Originally posted by Rigamarole
    you'll have to pose unnaturally to fit into the frame
    You mean like this?


    This message brought to you by NinetyWt, the Queen of Lubricants™.

  11. #11
    Stegodon Dragon's avatar
    Registered
    Mar 2009
    Location
    Central Arkansas
    Posts
    335
    No job is too hard for the person who does not have to do it.

  12. #12
    troubleagain
    Guest

    Default Re: The DoMeBo Photography Class - Lesson #1

    Is that Devil or Demon? Ooops, sorry, off topic. That's a lot of camera you have there!

  13. #13
    Stegodon
    Registered
    Mar 2009
    Location
    The Biggest Little City in the World (Sort of)
    Posts
    300

    Default Re: The DoMeBo Photography Class - Lesson #1

    Posting to subscribe.
    Aunt Em - Hate you, hate Kansas, took the dog - Dorothy.

  14. #14
    Stegodon
    Registered
    Mar 2009
    Location
    The Biggest Little City in the World (Sort of)
    Posts
    300

    Default Re: The DoMeBo Photography Class - Lesson #1

    Dragon - that's an armadillo, a tripod, and...a cat?

    More on-topic; will you be covering Macro mode, or is that something I should ask about now?


    Edited because Devil? Where the heck did I get Devil instead of Dragon? WTF, brain, WTF?
    Aunt Em - Hate you, hate Kansas, took the dog - Dorothy.

  15. #15
    Elephant
    Registered
    Feb 2009
    Location
    San Jose, CA
    Posts
    513

    Default Re: The DoMeBo Photography Class - Lesson #1

    I took some pictures, too. These are all taken with my Canon Digital Rebel. Each image is a link to a larger version of the same picture that you can click on.

    First up is a lovely Cala Lily. If you have a macro mode, you can get up close and personal. “Macro” now means the ability to focus on small thing close-up, but see the Wikipedia article for the whole story.

    . . . . . . . . . . . . . . . . . . . . . .

    Settings for the first: aperture: f/4.0, shutter speed: 1/4000 of a second, focal length: 28mm
    Settings for the second: f/8.0, 1/320sec , 80mm, macro

    Up next is my dog sunbathing. The first is an uninteresting angle from a standing position. The second is what you can get if you get down on the ground, in this case, lying on my stomach. One of the best things you can do to get better photos is to get down, get up, or get sideways.
    . . . . . . . . . .

    Settings for the first: f/16, 1/500sec, 48mm
    Settings for the second: f/13, 1/400sec, 28mm (I would have liked a lower f/stop to blur the background more, but sometimes the subject won’t cooperate for a second shot.)

    Then I set up a Vacuum Attack. The first picture is with a flash, even after I adjusted the color levels notice how it’s flat and harsh. The second is the same angle without the flash. The third uses an odd angle mentioned by Giles upthread. In the video world, this is called a Dutch Tilt.
    ..

    Settings for the first: f/4.0, 1/60sec with flash, 28mm
    For the second: f/3.5, 1/13sec*, 28mm
    For the third: f/3.5 1/10sec*, 28mm (*: anything slower than 1/60 is considered a slow shutter speed and a tripod would be used, but with the right conditions I can hold a camera steady down to about 1/10.)

    Last we have a little toy dog ball with legs.

    Settings: f/14, 1/500sec, 28mm

    Now we add a dog, and two things can happen. In this first picture, you can see the dog’s eye. It looks like the dog is about to pick up her toy.

    Settings: f/14, 1/500sec, 28mm

    But if we crop out the eye, it looks more like the little ball-guy is in peril. It’s also darker because the camera is on the shadow side of the scene. It would have been even better if I had been able to get teeth, but Raven really, really, really wanted her ball and was too quick. (Even though it’s her very favorite, we limit her time with this ball because it squeaks really loud.)

    Settings: f/13, 1/500sec, 28mm


    - - - - - - - - -
    In other news...
    I realized I haven’t linked to my own photography, so here is a small collection. It’s not necessarily my best work, just what I could find on my computer. This is my favorite picture I’ve taken, and I’m rather fond of this one I just took while on Maui.
    I’ll try to dig around and find my stuff from photography class, although I think the teacher still has the color slides from my final project.
    I do not bite my thumb at you, but I bite my thumb.

  16. #16
    Stegodon Dragon's avatar
    Registered
    Mar 2009
    Location
    Central Arkansas
    Posts
    335

    Default Re: The DoMeBo Photography Class - Lesson #1

    Quote Originally posted by sistercoyote
    Dragon - that's an armadillo, a tripod, and...a cat?

    More on-topic; will you be covering Macro mode, or is that something I should ask about now?


    Edited because Devil? Where the heck did I get Devil instead of Dragon? WTF, brain, WTF?
    Yes, armadillo, tripod, cat (Demon) Devil did not follow me to the Serenity rock.

    I'm a student, not the teacher....

    Trouble, did not have the video gear out there....

    That funny looking washed out place, I had a smudge on the lens.... Oops !!!!
    No job is too hard for the person who does not have to do it.

  17. #17
    Stegodon
    Registered
    Mar 2009
    Location
    The Biggest Little City in the World (Sort of)
    Posts
    300

    Default Re: The DoMeBo Photography Class - Lesson #1

    Quote Originally posted by Dragon
    Yes, armadillo, tripod, cat (Demon) Devil did not follow me to the Serenity rock.

    I'm a student, not the teacher....
    Yeah, sorry about that. I should have been clearer about who I was asking. That post was made of fail.
    Aunt Em - Hate you, hate Kansas, took the dog - Dorothy.

  18. #18
    Stegodon
    Registered
    Mar 2009
    Posts
    168

    Default Re: The DoMeBo Photography Class - Lesson #1

    The whole time reading Lesson #1, Van Halen was playing in my head.

    I'm putting my trusty PowerShot aside and trying to learn to love my more expensive, more gadget-y Kodak Z712 IS. I do not know what those letters and numbers mean. All I know is my trusty PS has a 6X zoom and the Kodak has 12X and I want those extra 6 zoomies.

    However, since I have not picked up the Kodak since I bought it 2 years ago, my assignment will have to be done tomorrow night because I have no idea where the cable for the Kodak is right now. I think my dog ate it.


    Got it bad, so bad. I'm hot for teacher.
    WTF did I just say?

  19. #19
    Stegodon
    Registered
    Feb 2009
    Location
    Moab, Utah
    Posts
    258

    Default Re: The DoMeBo Photography Class - Lesson #1

    I just wanted to mention that if you have a camera similar to the silver Canon in the OP or one like Dragon's pictured in the extreme close up in post #11; it is very important that you protect the lens assembly that pushes out in front of the camera. This 'wedding cake' design is very popular on small point and shoot style cameras. It saves weight and space and it looks cool when it deploys when you turn on the camera.
    The problem is that the linkages inside are very weak. If anything interferes with the lens going out or in the lens will jam and you will need to send the camera in for repair. Frequently, it is cheaper to get a new camera. Make very sure that the lens barrel is free from dust, sand or grit. Also make sure that no force is applied to push the lens in, by dropping it, for instance.
    Generally the best way to avoid problems is to actually use the wrist strap that comes with the camera and to keep the camera clean. I go as far as to recommend an air tight case for the camera. The reason that I'm stressing this so much is that we get customers in our shop every day that have cameras that no longer work because of issues with this 'wedding cake' style of lens assembly.
    This is the most beautiful place on Earth; there are many such places.

  20. #20
    Stegodon Dragon's avatar
    Registered
    Mar 2009
    Location
    Central Arkansas
    Posts
    335

    Default Re: The DoMeBo Photography Class - Lesson #1

    Quote Originally posted by Biggirl
    However, since I have not picked up the Kodak since I bought it 2 years ago, my assignment will have to be done tomorrow night because I have no idea where the cable for the Kodak is right now. I think my dog ate it.
    Consider yourself griped at.... 2 years? Arguhhhhhhhh....
    No job is too hard for the person who does not have to do it.

  21. #21
    Stegodon
    Registered
    Mar 2009
    Location
    The Biggest Little City in the World (Sort of)
    Posts
    300

    Default Re: The DoMeBo Photography Class - Lesson #1

    Chacoguy, how many do you get in because the lens cover on that sort of camera doesn't close anymore? My camera ends up with a sort of half-lidded eye look about 50% of the time.

    Edited to add: OPEN. Because the lens cover doesn't OPEN anymore. Good lord.
    Aunt Em - Hate you, hate Kansas, took the dog - Dorothy.

  22. #22
    Stegodon Dragon's avatar
    Registered
    Mar 2009
    Location
    Central Arkansas
    Posts
    335

    Default Re: The DoMeBo Photography Class - Lesson #1

    Quote Originally posted by chacoguy420
    I just wanted to mention that if you have a camera similar to the silver Canon in the OP or one like Dragon's pictured in the extreme close up in post #11; it is very important that you protect the lens assembly that pushes out in front of the camera.
    ::; snippy:::
    we get customers in our shop every day that have cameras that no longer work because of issues with this 'wedding cake' style of lens assembly.
    Yepper, very easy to mess it up.
    Note the 2 little cases. That is where they live if not in my shirt pocket. I usually have them in the shirt pocket with a lanyard around my neck. I shoot a lot of pics from my motorcycles while on the go.

    I am more likely to have my camera than my billfold... Don't leave home without it... Can't take a picture if the camera is at home.... :mrgreen:
    No job is too hard for the person who does not have to do it.

  23. #23
    Stegodon
    Registered
    Mar 2009
    Posts
    168

    Default Re: The DoMeBo Photography Class - Lesson #1

    Quote Originally posted by Dragon
    Quote Originally posted by Biggirl
    However, since I have not picked up the Kodak since I bought it 2 years ago, my assignment will have to be done tomorrow night because I have no idea where the cable for the Kodak is right now. I think my dog ate it.
    Consider yourself griped at.... 2 years? Arguhhhhhhhh....
    My PowerShot was so easy and fun and I know what all the buttons do and. . . please don't put this on my permanent record!
    WTF did I just say?

  24. #24
    Stegodon Dragon's avatar
    Registered
    Mar 2009
    Location
    Central Arkansas
    Posts
    335

    Default Re: The DoMeBo Photography Class - Lesson #1

    Got to go see if I can see the ISS pass over... Back in a while...
    No job is too hard for the person who does not have to do it.

  25. #25
    Member
    Registered
    Mar 2009
    Posts
    37

    Default Re: The DoMeBo Photography Class - Lesson #1

    Assignment A:
    Research the available shooting modes available on your camera. You don't have to use them all, just know they’re there. If your camera has a manual mode, read the instructions on how to use it. No, you don’t have to understand it yet.
    My Gear:

    Sony Cybershot DSC-S85 (4.1 MP, 2X Optical Zoom)
    8 years old, but very good for the time. I am in the market for a new one as I mentioned on my SDMB thread.

    Modes:
    Auto
    Video
    Macro
    Shutter Priority: 1/1000th to 8 sec.
    Aperture Priority: F2.1 to F8.0

    ...and a bunch of other crap.

    :::Raises Hand::: What is AE Lock?

    Assignment B:
    Take four photographs of stuff. Use the different shooting modes, different orientations, different flash settings, etc. The purpose is not the photographs themselves, but to become more familiar the options on your camera the manufacturers were so nice to have put in there. Try to remember what modes and settings you used, and post that info with the pictures.
    Picture #1: A little something-or-other flower outside my front door.

    Full Size
    No Flash, Macro Mode, Focal Length 9mm, F2.8, 1/200, ISO-100, Spot Metering <--- Whatever that means.
    Comments: I don't like all the negative space but this is the closest at which my camera would focus. Believe me...I tried.

    Picture #2: A gingerbread house still out from Christmas. Lit with diffused lighthing through my front window.

    Full Size
    No Flash, Macro, Mode, , focal Length 7mm, F2, 1/30, ISO-100, Spot Metering
    Comments: I took a lot of this same picture but don't want to bore you with the similar results. Macro Mode was on really just because I forgot to turn it off. The non-macro picture isn't much different either. I don't like the lack of focus in the foreground.

    Picture #3: Same Gingerbread House, but lit with interior lighting.

    Full Size
    No Flash, focal length 7mm, F2, 1/30, ISO 100, Spot Metering.
    Comments: I'm kind of flash-a-phobic. I'd much rather grab a tripod than use the flash. This picture could probably use some fill-in but on this camera the flash seems to wash out the foreground and looks very uneven.

    Picture #4: A blown glass thingy out the back window.

    Full Size
    No Flash, focal length 21mm, F2.8, 1/250, ISO 100, spot metering.
    Comments: Didn't center it horizontally very well. Would have liked the background a bit MORE in focus instead of COMPLETELY washed out.

  26. #26
    Elephant
    Registered
    Feb 2009
    Location
    San Jose, CA
    Posts
    513

    Default Re: The DoMeBo Photography Class - Lesson #1

    Quote Originally posted by Cyberhwk
    ...:::Raises Hand::: What is AE Lock?
    AE (Auto-Exposure) Lock forces the automatically-generated aperture and shutter speed to remain the same over a series of picture captures. If you’re taking multiples for a panorama or something, having them all at the same exposure settings is useful.
    ...
    Spot Metering <--- Whatever that means...
    Spot Metering is when the camera (or photographer) sets the exposure for one small area of the frame, instead of for the whole thing.
    I do not bite my thumb at you, but I bite my thumb.

  27. #27
    Stegodon
    Registered
    Mar 2009
    Posts
    143

    Default Re: The DoMeBo Photography Class - Lesson #1

    Quote Originally posted by Cyberhwk

    :::Raises Hand::: What is AE Lock?

    Spot Metering <--- Whatever that means.
    AE lock was also a way to fix backlighting. If you are posing someone with the sun behind him (good practice; otherwise they squint), walk up close, meter off the face, lock the exposure, then back up. The meter will base the exposure on the face, not the bright light behind it.

    Some P/S may not be able to do that. I think especially in lesser models, when you press the shutter release half way, it sets exposure and focus.

    Spot metering is potentially useful for a similar reason. A pro might be photographing something with a wide range of "correct" exposures. The brightest might require 1/60 sec at f/16---but there won't be any details in the shadows. The darkest might require 1/60 sec at f/4, but that will blow out the brightest spots. He might pick f/8, which is right in the middle.

    As I wrote in the setup thread, you can trade a shutter speed for an aperture.

    1/500@ f/1.4
    1/250@ f/2
    1/125@ f/2.8
    1/60@ f/4
    1/30@ f/5.6
    1/15@ f/8

    All these will all allow the same amount of light to reach the film or sensor. They're called "exposure values." In this case, they all represent EV10.

    http://en.wikipedia.org/wiki/Exposure_value

    If he isn't happy with 1/60 at f/8---maybe that gives too much depth of field or doesn't freeze the action enough---he could pick a different combination for the same EV, of course.

    Related nugget: I was reading a book by a pro who said that when you see a nightscape of a distant city with the moon over it, it's a multiple exposure. The reason is that film can't handle such a wide latitude (range of EVs) in the same shot. A full moon is much brighter than distant lights. If you expose for the city lights, the moon craters etc. will be washed out. Expose for the moon detail and the city lights will be weak. So pros would go out and shoot a roll of nothing but moon shots---just the moon in the sky---then when they needed one, they'd sandwich it with the slide of the city and print from there.

    I wonder if that problem exists in digital as well.
    My latest photos here: http://picasaweb.google.com/lobotomyboy63

    Major gear: Olympus E520 w/2 AF Zuiko, 3 adapted Minolta MD, Metz Flash, Digital King 0.7x wide angle auxiliary, Slik tripod, Lowepro pack, intervalometer en route, + Canon & Oly PS.

  28. #28
    Elephant
    Registered
    Feb 2009
    Location
    Garden Spot of the South
    Posts
    592

    Default Re: The DoMeBo Photography Class - Lesson #1

    Until I looked through the online manual, I had no idea that this camera would take black & white, and sepia photos!
    (all clickable thumbnails)
    Two sepias photos. Brightness=0, white balance=auto. For this one, ISO=1250, AF=multizone:

    For this one, ISO=200, AF=center:

    A black&white, on full automatic:

    Two color photos, on auto everything except white balance. This one set on "tungsten" (supposed to compensate for yellow light):

    This one on auto white balance:
    This message brought to you by NinetyWt, the Queen of Lubricants™.

  29. #29
    Stegodon
    Registered
    Mar 2009
    Posts
    143

    Default Re: The DoMeBo Photography Class - Lesson #1

    Quote Originally posted by sistercoyote
    Chacoguy, how many do you get in because the lens cover on that sort of camera doesn't close anymore? My camera ends up with a sort of half-lidded eye look about 50% of the time.

    Edited to add: OPEN. Because the lens cover doesn't OPEN anymore. Good lord.
    I had a problem with my Canon where, for no reason, half the lens cover didn't open. I tried turning it on/off a couple times, hoping that would fix it. No joy.

    I gently pushed it in that direction with the blade of a knife. Click! I think there's a spring that wasn't quite working.

    I had my Olympus for about three days when it did the same thing. I turned it on/off a couple times. No joy. I set it down, contemplating getting a knife again. Click!

    I was careful not to leave these out when their eyes were half open. You don't want the lens to get scratched.
    My latest photos here: http://picasaweb.google.com/lobotomyboy63

    Major gear: Olympus E520 w/2 AF Zuiko, 3 adapted Minolta MD, Metz Flash, Digital King 0.7x wide angle auxiliary, Slik tripod, Lowepro pack, intervalometer en route, + Canon & Oly PS.

  30. #30
    Stegodon Dragon's avatar
    Registered
    Mar 2009
    Location
    Central Arkansas
    Posts
    335

    Default Re: The DoMeBo Photography Class - Lesson #1

    I waited for the ISS to go zoom.


    Getting a picture at night is hard. this is all I got.
    No job is too hard for the person who does not have to do it.

  31. #31
    Stegodon
    Registered
    Mar 2009
    Posts
    143

    Default Re: The DoMeBo Photography Class - Lesson #1

    I wonder if you could accomplish the top photo with a tripod and stitch assist. Pan down, no sky, take a picture of the city. Pan up, sunset only. Then combine the two. On my Canon, the symbol is overlapping rectangles but I'll admit I've never tried it.

    http://en.wikipedia.org/wiki/Image_stitching
    My latest photos here: http://picasaweb.google.com/lobotomyboy63

    Major gear: Olympus E520 w/2 AF Zuiko, 3 adapted Minolta MD, Metz Flash, Digital King 0.7x wide angle auxiliary, Slik tripod, Lowepro pack, intervalometer en route, + Canon & Oly PS.

  32. #32
    Elephant
    Registered
    Feb 2009
    Location
    PDXtc, d00dz!
    Posts
    856

    Default Re: The DoMeBo Photography Class - Lesson #1

    Okay, so I started messing around with a couple of objets d'art around the house--the castle is made of Mt St Helens volcanic ash in a resin binding and the miniatures are old Ral Partha D&D figures that I painted myself a while ago. So, this is using natural light (diffused late afternoon rainy day through half opened curtains) and the close-up setting (I have a Kodak Easy Share C813, 10 megapixel with 3x optical zoom.) These are clickable thumbnail links to larger copies:


    This is closer in on the miniatures:


    Then I farted around doing other stuff for a while, but decided I rather liked the effect but the scale was too easily discerned from the background so I used a swatch of silk and some cardboard to make a backdrop for the pieces:


    I think this shot shows the detail on the miniatures to best advantage:


    By then the light was pretty much finished, so I switched gears a bit and used the flash and the image stabilizer to attempt to catch the enthusiasts at play--Widget goes up for the tip off:


    Bear gets air:


    I call this one "Pinky & The Brain":


    I'm also including a couple of shots I took a couple weeks ago at Heceta Head on the Oregon coast. This is taken from near the bridge, where a tiny creek runs out to the ocean, looking back north at the lighthouse:


    And Himself gave me a great Indiana Jones moment in a tiny seacave:


    ETA: Erm, had to do a quick crop on one shot to remove a potentially incriminating item in the background. Heh heh... Nothing to see here, move along! ops:
    "And I hope I don't get born again, 'cuz one time was enough!" -- Mark Sandman

  33. #33
    Stegodon
    Registered
    Mar 2009
    Posts
    143

    Default Re: The DoMeBo Photography Class - Lesson #1

    Ninetywt, I wonder why your second picture isn't as sharp as the first or third. It looks like you set the camera on the table (which would eliminate shake), put the object in the center (works well for the AF), and basically kept everything constant. A lack of sharpness might be explained by a high ISO, but if the other photos are at the same ISO...?

    This is one of my gripes about my Olympus btw. I see the same in some of SmartAleq's pics. The castle in some is sharp enough to be almost tactile, rendered nicely...but the little wizard? Choosing a smaller aperture (higher f/number) would probably help, but the lenses on these cameras probably don't have great specs for sharpness, usually in the edges but also in the center. There may also be variations based on what f/stop you're using.

    I guess I was spoiled by the 35mm equipment I had (and still have, in some cases).

    SmartAleq, I like the picture looking toward the lighthouse. I don't know much about composition but I know what I like.

    I'd shoot several of that one with different shutter speed/aperture combinations and/or tweak with photoshop. I'd also take off my shoes and walk through the sand, leaving footprints, then photograph it all again.
    My latest photos here: http://picasaweb.google.com/lobotomyboy63

    Major gear: Olympus E520 w/2 AF Zuiko, 3 adapted Minolta MD, Metz Flash, Digital King 0.7x wide angle auxiliary, Slik tripod, Lowepro pack, intervalometer en route, + Canon & Oly PS.

  34. #34
    Stegodon
    Registered
    Mar 2009
    Location
    The Biggest Little City in the World (Sort of)
    Posts
    300

    Default No photos yet

    But here's my gear:


    Pentax 750Z

    lobotomyboy63, I managed to fix it once before using just my fingernail, but alas, it has re-broken. I may try - carefully with a knife.

    The lens cover closes just fine, thank goodness.
    Aunt Em - Hate you, hate Kansas, took the dog - Dorothy.

  35. #35
    Elephant
    Registered
    Feb 2009
    Location
    Garden Spot of the South
    Posts
    592

    Default Re: The DoMeBo Photography Class - Lesson #1

    Quote Originally posted by lobotomyboy63
    Ninetywt, I wonder why your second picture isn't as sharp as the first or third. It looks like you set the camera on the table (which would eliminate shake), put the object in the center (works well for the AF), and basically kept everything constant. A lack of sharpness might be explained by a high ISO, but if the other photos are at the same ISO...?
    The auto-focus? It looked to me (a rank amateur) that the camera focused on the background instead of the figure. I had used 'center' instead of 'multizone' for the AF. Do you think maybe that's part of it? I did set the camera on the table.
    This message brought to you by NinetyWt, the Queen of Lubricants™.

  36. #36
    Stegodon
    Registered
    Mar 2009
    Posts
    143

    Default Re: No photos yet

    Quote Originally posted by sistercoyote
    But here's my gear:


    Pentax 750Z

    lobotomyboy63, I managed to fix it once before using just my fingernail, but alas, it has re-broken. I may try - carefully with a knife.

    The lens cover closes just fine, thank goodness.
    That is one spiffy looking camera! Black or chrome? Both!

    You lost me. The lens cover closes...what doesn't? Or did you just try and it worked?

    FTR I set the camera on its back, positioned the (butter) knife has if prepared to stab down through the lens.
    My latest photos here: http://picasaweb.google.com/lobotomyboy63

    Major gear: Olympus E520 w/2 AF Zuiko, 3 adapted Minolta MD, Metz Flash, Digital King 0.7x wide angle auxiliary, Slik tripod, Lowepro pack, intervalometer en route, + Canon & Oly PS.

  37. #37
    Stegodon
    Registered
    Mar 2009
    Posts
    143

    Default Re: The DoMeBo Photography Class - Lesson #1

    Quote Originally posted by NinetyWt
    Quote Originally posted by lobotomyboy63
    Ninetywt, I wonder why your second picture isn't as sharp as the first or third. It looks like you set the camera on the table (which would eliminate shake), put the object in the center (works well for the AF), and basically kept everything constant. A lack of sharpness might be explained by a high ISO, but if the other photos are at the same ISO...?
    The auto-focus? It looked to me (a rank amateur) that the camera focused on the background instead of the figure. I had used 'center' instead of 'multizone' for the AF. Do you think maybe that's part of it? I did set the camera on the table.
    One close inspection, you're right: look at how sharp the envelope behind it is. I haven't kept up with the technology but at one time, I think the AF sensors were "looking" for straight edges.

    Whatever the case, a very slight repositioning of the camera had a dramatic impact on the focus, something for you to be cognizant of while making pictures. "But it looked really good on the 2.5" screen right after I shot it" is my litany.

    BTW as you probably know some (a lot? most? all?) editing software will allow you to manipulate for things like B/W. I'd rather shoot in full color, then manipulate copies of the original. I mean, if you shoot in B/W I presume that's all that's recorded and you can't "add" color in editing. Or do cameras actually record it in color?
    My latest photos here: http://picasaweb.google.com/lobotomyboy63

    Major gear: Olympus E520 w/2 AF Zuiko, 3 adapted Minolta MD, Metz Flash, Digital King 0.7x wide angle auxiliary, Slik tripod, Lowepro pack, intervalometer en route, + Canon & Oly PS.

  38. #38
    Elephant
    Registered
    Feb 2009
    Location
    PDXtc, d00dz!
    Posts
    856

    Default Re: The DoMeBo Photography Class - Lesson #1

    Quote Originally posted by lobotomyboy63
    This is one of my gripes about my Olympus btw. I see the same in some of SmartAleq's pics. The castle in some is sharp enough to be almost tactile, rendered nicely...but the little wizard? Choosing a smaller aperture (higher f/number) would probably help, but the lenses on these cameras probably don't have great specs for sharpness, usually in the edges but also in the center. There may also be variations based on what f/stop you're using.

    I guess I was spoiled by the 35mm equipment I had (and still have, in some cases).

    SmartAleq, I like the picture looking toward the lighthouse. I don't know much about composition but I know what I like.

    I'd shoot several of that one with different shutter speed/aperture combinations and/or tweak with photoshop. I'd also take off my shoes and walk through the sand, leaving footprints, then photograph it all again.
    Yeah, the P&S cameras are fine for casual snaps but useless for anything really tricky--this is why I lust after a decent digital SLR and mourn the fact that from what I've been able to gather my old lenses won't work on the new mounts. Which is a pity because I have a couple of really useful all-around lenses I'm very familiar with.

    I took a whole bunch of different angles around that tree, but I liked that particular one because the spray of stones around the base of the root tangle gave an impression of another dry streambed along with the real one. As for taking off your shoes and doing ANYTHING, I laugh, ha ha! This is FEBRUARY, in OREGON. Go barefoot only if you don't mind a little frostbite!

    I didn't do any tweaking with these, I wanted to get as close to the shot I want with just the camera--I know photoshop can do amazing stuff but A) I don't know how to do that fancy crap and B) you gotta know what your camera can do on its own before relying on "we'll fix it in post."

    What I really don't like about the P&S cameras is that they don't handle the diffused yet bright light we get so much of around here and a lot of pics turn out washed out in color because the camera can't adapt to the fact that even without a bright glary sun going on it's nevertheless quite bright--the camera overcompensates for the diffuse light and you end up with some pretty blah looking shots. Any advice on overcoming this would be greatly appreciated!
    "And I hope I don't get born again, 'cuz one time was enough!" -- Mark Sandman

  39. #39
    Stegodon
    Registered
    Mar 2009
    Location
    The Biggest Little City in the World (Sort of)
    Posts
    300

    Default Re: No photos yet

    Quote Originally posted by lobotomyboy63
    That is one spiffy looking camera! Black or chrome? Both!

    You lost me. The lens cover closes...what doesn't? Or did you just try and it worked?

    FTR I set the camera on its back, positioned the (butter) knife has if prepared to stab down through the lens.
    The lens cover closes, but doesn't always open all the way.
    Aunt Em - Hate you, hate Kansas, took the dog - Dorothy.

  40. #40
    Stegodon
    Registered
    Mar 2009
    Posts
    143

    Default Re: The DoMeBo Photography Class - Lesson #1

    Quote Originally posted by SmartAleq
    Quote Originally posted by lobotomyboy63
    This is one of my gripes about my Olympus btw. I see the same in some of SmartAleq's pics. The castle in some is sharp enough to be almost tactile, rendered nicely...but the little wizard? Choosing a smaller aperture (higher f/number) would probably help, but the lenses on these cameras probably don't have great specs for sharpness, usually in the edges but also in the center. There may also be variations based on what f/stop you're using.

    I guess I was spoiled by the 35mm equipment I had (and still have, in some cases).

    SmartAleq, I like the picture looking toward the lighthouse. I don't know much about composition but I know what I like.

    I'd shoot several of that one with different shutter speed/aperture combinations and/or tweak with photoshop. I'd also take off my shoes and walk through the sand, leaving footprints, then photograph it all again.
    Yeah, the P&S cameras are fine for casual snaps but useless for anything really tricky--this is why I lust after a decent digital SLR and mourn the fact that from what I've been able to gather my old lenses won't work on the new mounts. Which is a pity because I have a couple of really useful all-around lenses I'm very familiar with.

    I took a whole bunch of different angles around that tree, but I liked that particular one because the spray of stones around the base of the root tangle gave an impression of another dry streambed along with the real one. As for taking off your shoes and doing ANYTHING, I laugh, ha ha! This is FEBRUARY, in OREGON. Go barefoot only if you don't mind a little frostbite!

    I didn't do any tweaking with these, I wanted to get as close to the shot I want with just the camera--I know photoshop can do amazing stuff but A) I don't know how to do that fancy crap and B) you gotta know what your camera can do on its own before relying on "we'll fix it in post."

    What I really don't like about the P&S cameras is that they don't handle the diffused yet bright light we get so much of around here and a lot of pics turn out washed out in color because the camera can't adapt to the fact that even without a bright glary sun going on it's nevertheless quite bright--the camera overcompensates for the diffuse light and you end up with some pretty blah looking shots. Any advice on overcoming this would be greatly appreciated!
    What, no barefoot? Not willing to suffer for your art?

    I use Picasa for editing, btw. I don't do much with it. I "sharpen" and adjust fill light, highlights, and shadows. And crop, I guess. That's about it. Oh, and remove redeye.

    I subscribe to the same thought pcess. After all with 35mm I handed the film over and either I got it or I didn't. Yeah, I might be able to pay $$$ to have them burn/dodge or crop something while printing but it's best to TCOB through the viewfinder. Anyway you might make a copy and play around with it some. As you probably know, if the detail isn't there in the original, manipulating it won't make it magically appear...but who knows?

    As for the (underlined) comment: you might try setting your exposure compensation to underexpose everything by about 1/3 stop, then leave it there. I read that some 35mm pros do that to get better saturation...they just set the ISO knob to the wrong ISO, effectively.
    My latest photos here: http://picasaweb.google.com/lobotomyboy63

    Major gear: Olympus E520 w/2 AF Zuiko, 3 adapted Minolta MD, Metz Flash, Digital King 0.7x wide angle auxiliary, Slik tripod, Lowepro pack, intervalometer en route, + Canon & Oly PS.

  41. #41
    Elephant
    Registered
    Feb 2009
    Location
    PDXtc, d00dz!
    Posts
    856

    Default Re: The DoMeBo Photography Class - Lesson #1

    Quote Originally posted by lobotomyboy63
    As for the (underlined) comment: you might try setting your exposure compensation to underexpose everything by about 1/3 stop, then leave it there. I read that some 35mm pros do that to get better saturation...they just set the ISO knob to the wrong ISO, effectively.
    Unfortunately, this is a really, REALLY stoopid camera that doesn't DO f-stop or ISO--it's got nothing but those cutesy "modes" like "beach" and "sunset" and "snow" and all that nonsense. I play around with those trying to find something that will allow a little oversaturation but so far I haven't found the winning combo.

    I did take some photography classes long ago in college and learned a lot--especially about b&w developing and printing which of course is TOTALLY useless in the digital age. One thing I absolutely love about digital cameras, though, is that you can take a billion pics of the same subject and not have to worry about the expense. I used to figure if I got 2-5 good shots out of fifty I was doing well and I love how profligate I can be with the digi.

    Something tells me I'm really gonna have to bite the bullet and buy an SLR...
    "And I hope I don't get born again, 'cuz one time was enough!" -- Mark Sandman

  42. #42
    Stegodon
    Registered
    Mar 2009
    Location
    The Biggest Little City in the World (Sort of)
    Posts
    300

    Default Re: The DoMeBo Photography Class - Lesson #1

    Quote Originally posted by SmartAleq
    Something tells me I'm really gonna have to bite the bullet and buy an SLR...
    I desperately want a DSLR, but they're out of my reach right now $$-wise. Alas.
    Aunt Em - Hate you, hate Kansas, took the dog - Dorothy.

  43. #43
    Stegodon Dragon's avatar
    Registered
    Mar 2009
    Location
    Central Arkansas
    Posts
    335

    Default Re: The DoMeBo Photography Class - Lesson #1

    Quote Originally posted by SmartAleq
    :snip:
    One thing I absolutely love about digital cameras, though, is that you can take a billion pics of the same subject and not have to worry about the expense. I used to figure if I got 2-5 good shots out of fifty I was doing well and I love how profligate I can be with the digi.

    Something tells me I'm really gonna have to bite the bullet and buy an SLR...
    Yes, a thousand times yes.... I spent soooooooo much $$$$$$$$$ in the good old days and I did become a better picture taker because I really tried to get it right the first time due to $$$$..

    Now I can play and it has been a while where I don't take a lot of shots of the same thing unless it is too fast, ISS pass, or I do not have any time at all, one handed on a moving motorcycle, but the ability to pic and chose and play with it in 'Irfanview", shameless plug because I love it and it's price, is a real "today is way better than yesterday".....
    No job is too hard for the person who does not have to do it.

  44. #44
    Stegodon
    Registered
    Feb 2009
    Location
    Columbus, Ohio
    Posts
    275

    Default Re: The DoMeBo Photography Class - Lesson #1

    Yes, for me one of the big positives of digital photography is that you no longer have to pay for film or paper. However, even though picture-taking has become nearly free (you still have to pay for electricty and for computer storage), you still need to take some care with your photographs.

    For example, on Saturday, I took about 350 pictures of a parade. That would have been 9 rolls of 35 mm film (allowing for about 38 pictures from each roll): if I were still using film, I doubt if I'd have taken more than 100 pictures because of the cost. However with each picture I tried to get decent composition, with something interesting in the picture, and not including distracting elements, so I selected 55 of them (about one in six) to post on Flickr.

    That's a low rate of selection for me, and it's because the parade (as parades do) was always moving, so you take pictures "just in case" which turn out not to be the best. My real hobby is taking pictures of buildings, and with those you can take your time, compose very carefully, and eliminate more distractions (including waiting for people standing in front of you to move on). So when I'm going round towns taking those pictures, often I'll post one in two to Flickr.

    I've also taken pictures of cosplay at some anime conventions, and again there you can take your time, because people will pose for you, and move to somewhere with a less distracting background, so again if you're being careful you can get to a one in two ratio.

    Examples of the three kinds:
    Parade:
    http://www.flickr.com/photos/75905404@N00/3353759841/

    Building:
    http://www.flickr.com/photos/75905404@N00/802422791/

    Cosplay:
    http://www.flickr.com/photos/75905404@N00/1350077772/

  45. #45
    Stegodon
    Registered
    Mar 2009
    Posts
    143

    Default Re: The DoMeBo Photography Class - Lesson #1

    Quote Originally posted by SmartAleq
    Quote Originally posted by lobotomyboy63
    As for the (underlined) comment: you might try setting your exposure compensation to underexpose everything by about 1/3 stop, then leave it there. I read that some 35mm pros do that to get better saturation...they just set the ISO knob to the wrong ISO, effectively.
    Unfortunately, this is a really, REALLY stoopid camera that doesn't DO f-stop or ISO--it's got nothing but those cutesy "modes" like "beach" and "sunset" and "snow" and all that nonsense. I play around with those trying to find something that will allow a little oversaturation but so far I haven't found the winning combo.
    This shows that you can compensate...?
    http://www.kodak.com/eknec/PageQuerier. ... cale=en_US


    Quote Originally posted by SmartAleq
    I did take some photography classes long ago in college and learned a lot--especially about b&w developing and printing which of course is TOTALLY useless in the digital age. One thing I absolutely love about digital cameras, though, is that you can take a billion pics of the same subject and not have to worry about the expense. I used to figure if I got 2-5 good shots out of fifty I was doing well and I love how profligate I can be with the digi.

    Something tells me I'm really gonna have to bite the bullet and buy an SLR...
    I thought the same thing but decided against a DSLR. The other thing I love about P/S is that I'll actually carry it. Back in the day, it was 35mm camera, 50mm for low light, 80-200 zoom for tele, 28-70 for wide to medium, flash, extra film and batteries, lens cleaning kit, and occasionally shutter release, tripod...how many times, back in the day, did I leave my camera at home? Lugging it around got old but you can't get the picture if you don't have a camera with you.

    While I'm not totally satisfied with my Canon it is a good camera for what it is. I went the opposite direction in buying the Olympus: something that actually fits in a shirt pocket. And I'm awaiting the arrival of this case:

    http://www.walmart.com/catalog/product. ... d=10297714

    Compact, hardshell, clips to belt. Dirt cheep, too!

    Thing is, most of my pics will die on the computer screen. They probably would pass for a 4x6, maybe even a 5x7. But I won't print enough, let alone enlarge enough, to justify the extra expense. YMMV of course.
    My latest photos here: http://picasaweb.google.com/lobotomyboy63

    Major gear: Olympus E520 w/2 AF Zuiko, 3 adapted Minolta MD, Metz Flash, Digital King 0.7x wide angle auxiliary, Slik tripod, Lowepro pack, intervalometer en route, + Canon & Oly PS.

  46. #46
    Stegodon
    Registered
    Feb 2009
    Location
    Moab, Utah
    Posts
    258

    Default Re: The DoMeBo Photography Class - Lesson #1

    Here's some shot that I thought I would share.


    This is a high speed action shot taken at 1/500/sec at f5.6.


    This is a collage of similar shots taken in a fast series.


    This at the other end of the spectrum. It was dark out when I shot this; the exposure is one full second at f4.


    This is a shot of my dog, Chaco, looking slightly insane. This is a good example of depth of field. The aperture was not too big (f5.6) but, I used a telephoto (200mm) to zoom in on him. The longer the focal length of your lens, the less depth of field you have. You can use this too hint at other elements in the shot without drawing interest away from you main subject. I this case, you get the hint of a dog to the left in the frame.


    This other worldly shot was accomplished by taking a photo of the reflection of a cliff in a stream and turning it upside down.
    This is the most beautiful place on Earth; there are many such places.

  47. #47
    Stegodon
    Registered
    Mar 2009
    Location
    The Biggest Little City in the World (Sort of)
    Posts
    300

    Default Re: The DoMeBo Photography Class - Lesson #1

    Eventually, I am going to make this slip, so I'm going to say this now:

    If I refer to a PHD camera, I mean P/S. PHD = Push Here, Dummy.

    And yes, I have a PHD camera myself.

    chacoguy420, that last shot is really cool. And your dog does look insane.
    Aunt Em - Hate you, hate Kansas, took the dog - Dorothy.

  48. #48
    Stegodon
    Registered
    Feb 2009
    Location
    Moab, Utah
    Posts
    258

    Default Re: The DoMeBo Photography Class - Lesson #1

    I remembered something I left out. If you have a point and shoot with the mode settings: flower, mountain, runner etc.; you can take some test shots and plug your memory chip into your computer. Then, right click on an image; at the bottom of the pop up menu, click on properties. Frequently, it will display your metadata witch will include your shutter speed and aperture. This will give some idea what those icon settings are doing.
    This is the most beautiful place on Earth; there are many such places.

  49. #49
    Stegodon Dragon's avatar
    Registered
    Mar 2009
    Location
    Central Arkansas
    Posts
    335

    Default Re: The DoMeBo Photography Class - Lesson #1

    chacoguy420, what a great idea on the stream shot. I wish my brain worked that way....
    No job is too hard for the person who does not have to do it.

  50. #50
    Stegodon Dragon's avatar
    Registered
    Mar 2009
    Location
    Central Arkansas
    Posts
    335

    Default Re: The DoMeBo Photography Class - Lesson #1

    I was messin with a camera today.

    I took 73 pictures. Posting these 28 that show different aspects of the what I was doing.

    They have been resized, sharpened at 10 out of 99. No other changes made.

    Fire shots and one of Colleen and the yard pictures are what they are.

    All the others are left handed from a moving motorcycle without being able to see what the LCD screen was showing. Camera (Fuji f-10, no image stabilization, all moving shots were at ISO 400.) was on a strap around my neck. All operation was one handed.
    No job is too hard for the person who does not have to do it.

+ Reply to thread

Posting rules

  • You may not post new threads
  • You may not post replies
  • You may not post attachments
  • You may not edit your posts